digital render of a grey roof on a brick house

Installation Guide for Multiverges

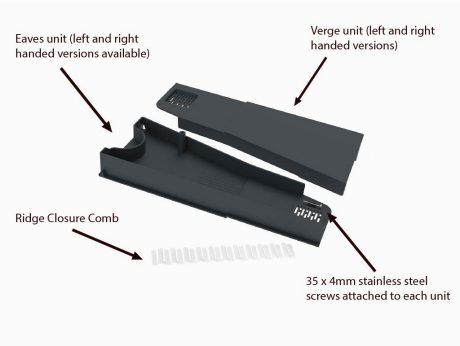
The Sandtoft Multiverge system has been specially designed to suit most single lap large format concrete and clay roof tiles (suits batten gauges from 280 to 345mm). 

The system is extremely quick and easy to fit and depending upon the particular tile, is either closely colour matched or coloured to complement the tiles. 

Components

Multiverge component diagram with labels
Multiverge Component Diagram

Compatibility

Multiverge is compatible with most single lap large format concrete and clay tiles, including the following Sandtoft tiles:

  • Double Pantile 
  • Double Roman   
  • Calderdale Edge 
  • Dual Calderdale Edge
  • TLE/Dual TLE 
  • Lindum 
  • Olympus
  • Cassius
  • Rivius  

With additional preparation, the Multiverge can also fit several medium format pantile and profile tiles, including the following Sandtoft tiles:  

  • Standard Pattern  
  • Neo
  • Shire Pantile

Installation guide for Multiverge

Colours

Dark Grey, Brown, Natural Red and Red Multi

Due to different computer monitors/calibrations the images shown may not be an accurate representation of the final products colour.

Standard Installation

1)

Lay the underlay in the usual way, allowing a 25mm overhang at the verge. Set out the tile battens at the appropriate gauge for the tile. Extend each batten 25mm beyond the outer edge of the wall or the bargeboard and fix. This dimension positions the verge units approximately 5mm off the wall or bargeboard. Alternatively, install each batten flush with the outer edge of the wall or the bargeboard and install a 25mm thick vertical batten.


2)

Position an eaves course tile at the verge with the correct overhang over the eaves and verge. Locate the eaves unit onto the tile as shown. Securely fix the eaves unit to the wall or bargeboard through the fixing hole using a stainless steel screw no less than 60mm in length (screws - not supplied). Screw caps can be used in addition to the fixing if it is desired that the fixing be hidden (not supplied)


3)

Screw through an appropriate fixing hole into the centre of the tile batten using a 35 x 4mm stainless steel screw (supplied in the verge unit).


4)

The verge unit is versatile and can be installed in several ways, here is one example:

With the verge unit in place screw through an appropriate fixing hole into the centre of the batten. Follow this procedure for each tile course up to the ridge. Fix all verge tiles. At the right hand verge, tiles can also be secured using tile clips if required.  

5)

Before inserting the top course verge units into their final positions locate the ridge closure comb onto the lower edges of each verge unit as shown. This will close the gap between the verge units and the wall. If you are using a plastic ridge end cap the ridge closure comb is not required. For some tile profiles and roof pitches it may be necessary to cut the top course verge units to form a mitre either side of the ridge apex.


6)

Start/terminate the ridge with a block end ridge tile or plastic ridge cap to cover the top of the verge units.


Medium Format Installation

1)

Lay the underlay in the usual way, allowing a 25mm overhang at the verge. Set out the tile battens at the appropriate gauge for the tile. Install each batten flush with the outer edge of the wall or the bargeboard and fix. This dimension positions the verge units approximately 5mm off the wall or bargeboard.


2)

Fix a vertical batten of 38 x 25mm along the edge of the tile batten into each batten end using a screw with a minimum length of 45mm (not supplied). Ensure that you fit the batten the correct way round to ensure the total dimension between the wall and the edge of your batten is 25mm.


3)

Position an eaves course tile at the verge with the correct overhang over the eaves and verge. Locate the eaves unit onto the tile as shown. Securely fix the eaves unit to the wall or bargeboard through the fixing hole using a stainless steel screw no less than 60mm in length (screws - not supplied). Screw caps can be used in addition to the fixing if it is desired that the fixing be hidden (not supplied).


4)

Whilst installation methods displayed in the standard installation can still be used, it is recommended that when used with Medium Format tiles, the verge unit is slid on prior to the tile. The additional work required to fit medium format tiles has been completed, please refer to step 5 of the standard installation to continue.


Download this page as a PDF

Read more

Find out more by reading our other Roof Tips and Advice articles

A-Z guide to parts of a roof

Read our roof terminology glossary – an easy-to-understand guide to the structure of a roof.

What are bonding gutters?

Click to find out more about bonding gutters.

Roof fixing FAQs

Discover the answers to commonly asked questions about roof fixings, including how to safely secure roof tiles and the benefits of dry fix systems.

Downloads

Search now to download product information, technical guides, brochures and more

Contact

Got a question? Send us a message and we'll be in touch to help.

Stockists